- Go to http://www.freeplaymusic.com/search/.
- On the left write your keywords or choose your feel or tempo, etc. (You do not need to make a selection for each choice. I often just choose one and browse)
- Click search
- In each selection you will get a short description of the music piece. You can also preview it by clicking on a length of time of the clip on the preview side.
- Once you have found the clip you like, right-click on the length you want on the MP3 side and 'save target as'
- Save it someplace you will remember. It's usually a good idea to keep them all in the same spot to easily go through your choices.
- In Moviemaker you need to choose import audio.
- You can now drag the clip you want to use down to your timeline in the audio/music layer.
Friday, February 24, 2012
Music
Adding music to your movie adds a nice touch. Freeplay Music is a fantastic resource to find theme music for your movie project but can also be used as background music for a powerpoint presentation. It is easily
searchable according to type, tempo, style and feel. There are many different
royalty-free instrumentals available. It can give a really original feel to any
presentation you create.
Thursday, February 9, 2012
Sound Effects
http://soundbible.com/ is a great site for free sound effects for your movie.
- Click on sound effects
- type in the sound you want (ex. splashing water)
- You will get a list of suggestions. You can play them to preview them.
- When you find one that you like click on it's title.
- Click on the MP3 icon
- Choose save
- Save it into a place you will remember (Make a folder to hold all your songs)
- Click close when it is done.
- In movie maker, click import sound and find the file
- You can now drag it onto your timeline in the audio/music layer
Wednesday, February 8, 2012
Using Only the Audio From a Video Clip
Sometime I take a video and realize that I just want to use the audio from the clip and not necessarily the video. Separating the two is pretty easy.


- Insert the video clip into your timeline.
- Choose the little microphone icon to narrate the timeline.
- From the 2nd drop down menu choose: Rec. Playback
- Click Start Narration
- Click Stop Narration when it is done
- Save it someplace you will remember
- The file should have automatically gone into your timeline in the audio/music layer of your timeline.
- You can now delete the video clip from your timeline and the just the audio will be there.
- Click done to get out of the narrate view.
Note: If you want to just use the video and not the audio from a clip you just have to mute the clip.
Understanding the Time Line View
You can view your movie in 2 different views: the storyboard view and the timeline view.
The storyboard view shows you your clips and transitions. It is great because it is simple and clear but when you start editing your movie you will need to work in timeline view as well.
The timeline view shows you the layers of your movie as well as the timing.

The storyboard view shows you your clips and transitions. It is great because it is simple and clear but when you start editing your movie you will need to work in timeline view as well.
The timeline view shows you the layers of your movie as well as the timing.

When first looking at it can sometimes seem very overwhelming.
At the very top of the timeline there are controls. They allow you to
- set the audio level
- narrate
- zoom in to make the timeline appear bigger (very useful when you want to see more detail)
- zoom out to make the timeline appear smaller (useful when you want to see the time of your whole movie)
- go back to the beginning of the movie
- play the movie
- go back to storyboard view
- Video: The first layer of the timeline view has your actual videos and pictures as you have put them in your movie. You can also see how they overlap with each other when transitions have been used.
- Transition: The second layer shows you your transitions. You can stretch them to get bigger. (For example if you want the two clips to fade into each other for a longer amount of time)
- Audio: This layer has the audio for your film. If you want to mute a clip you can easily right-click here and select mute.
- Audio/Music: This layer has any outside audio or music that you have brought in (ex. sound effects, narration, music). Note: When you insert it here, the audio is not attached to a clip so if you later rearrange or delete some clips you will probably have to move it's place in the timeline.
- Title Overlay: This layer shows you any titles you may have put in your movie like a subtitle, a title page or credits. It is easy to change the length it appears in your film from here. Just stretch it and move it around. You can also easily double-click on it to edit it from here.
Monday, February 6, 2012
Bringing in videos or music from youtube
Youtube has a great selection of sound effects that you can use for your movie and it's pretty easy to download and convert them into MP3 format. I use zamzar to download the videos or sounds I want to use.

- Go on youtube and search for the specific sound that you want.
- Once located, copy the URL (the internet address)
- Go to http://www.zamzar.com/url/
- paste the URL in the box.
- Choose the format you want to use from the drop down menu. (If you just want to use the sound choose MP3)
- Enter your email address. (It will be emailed to you soon after)
- Click convert.
- You will get a warning message, click OK
- Check your email and click on the link. (It will be a long link that looks like this: http://www.zamzar.com/getFiles.php?uid=8322108895434001328543010&targetID=jtsRUSVJcF13Yyc75ptFJk_Y_Z8Y6VjCVQ)
- Right click on the green 'Download Now' button and choose 'Save target As'
- Name your file and put it in a place you will remember. It's probably a good idea to create a folder where you will store all of them.

Sunday, February 5, 2012
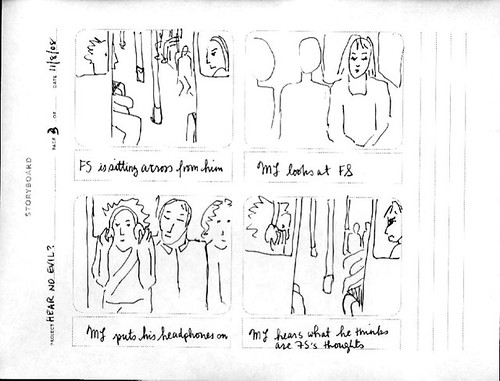
Storyboard
Once you have your idea it's a good idea to make a storyboard. A storyboard is basically a plan of your movie. When doing a google search for a template this was one of the first ones I found which I thought worked well:
http://www.printablepaper.net/preview/storyboard-letter-16to9-2x3
Each box represents each different shot in your movie. You can draw stick figures to represent your actors and write down any dialogue or special instructions. Making a storyboard is to help you organize yourself when filming so it's very personal. Some people might just want to write notes while others might want to draw. Here are some tips that I think are useful to stay the most organized.
- Label your shots by number and then a short description (ex. 01 John in kitchen). You can then use the same title for the clip when you bring it into moviemaker. Make sure the number is first so that it will go in order in moviemaker.
- Clearly mark the characters in each shot. This will make it easier to see which students you need to film at a given time.
- As you film each shot, cross them out on your storyboard. It will make it easy to see what is left to film
 |
| Here is one with pictures and small notes |
 |
| Here is an example of just words. |
Here are some common abbreviations for storyboard descriptions that might be helpful:
WS - Wideshot
CU - Close Up
Pan - Turn the camera left or right
Tilt - Turn the camera up or down
Moving shot - camera follows action
Cut to - switch to
VO - voice over (narration)
SFX - sound Effect
Fonts
When creating titles sometimes the default fonts just don't cut it. It's nice to find a nice fancy font that will complement your movie. A site I like to use is 'abstract fonts'. There are so many beautiful fonts to choose from and a lot of them are free.
www.abstractfonts.com
Here are step-by-step directions to get them on your computer.
you can search for anything you like. Scroll to the bottom to find the free ones.
Downloading fonts:
1. Click on the font that you want.
2. Click on download
3. click open
4. when the file opens, click extract all files
5. click next
6. save to windows: fonts
-click browse
---click my computer
-----click local disk
--------click WINDOWS
------------click fonts
select ok
7. click next
8. finish
Subscribe to:
Posts (Atom)